No products in the cart.
Vietnam eSIM Activation Step-by-Step: The Ultimate 2025 Guide
Vietnam eSIM activation step-by-step is the phrase every smart traveler should know before landing in Vietnam. Whether you’re a digital nomad, tourist, or business visitor, activating your Vietnam eSIM in the right way means instant connectivity, no stress, and no need to find a SIM shop at the airport. In this guide, you’ll get a clear, Vietnam eSIM activation step-by-step process, tips to avoid mistakes, and pro tricks to stay online from the moment you arrive.
Why Choose Vietnam eSIM? Activation Step-by-Step Advantages
Vietnam eSIM activation step‑by‑step is easier and faster than using a physical SIM. Here’s why more travelers switch every year:
- Instant delivery—no waiting at airport counters
- Activate before arrival or at your hotel
- Keep your home SIM active (WhatsApp, OTP, SMS)
- No risk of losing your main SIM
- Better English-language support and clear instructions
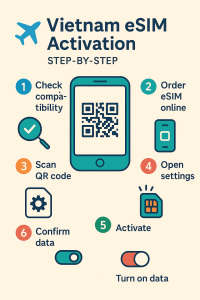
Vietnam eSIM Activation Step-by-Step: 7 Simple Steps
- Check your phone compatibility: Ensure your device supports eSIM (iPhone XR+, Samsung S20+, Pixel 4+, etc).
- Order your eSIM online: Use a reputable provider like GoVnSIM (read Vietnam eSIM reviews from international tourists for user feedback).
- Receive your eSIM QR code by email: Instantly, often within 5 minutes of payment.
- Open your phone settings: Go to “Mobile Data” or “Cellular,” select “Add eSIM” or “Add Data Plan.”
- Scan the eSIM QR code: Point your phone’s camera at the QR (on screen or printed out).
- Follow on-screen prompts: Confirm installation. Name your data plan (e.g., “Vietnam eSIM”).
- Enable mobile data for the new eSIM: Turn on “Mobile Data” for your Vietnam eSIM profile—done!
Vietnam eSIM Activation Step-by-Step: Quick Comparison Table
| Activation Method | Physical SIM | eSIM (Step-by-Step) |
|---|---|---|
| Where to get | Shop/airport counter | Order online (email) |
| Setup time | 15–30 min (in-person) | 5–10 min (DIY, anywhere) |
| Paperwork | Show passport at counter | Upload passport photo online |
| Language barrier? | Possible | No—English instructions |
| Risk of losing SIM? | Yes | No |
Vietnam eSIM Activation Step-by-Step: Internal Link to Full Reviews
Still deciding? See Vietnam eSIM reviews from international tourists for authentic, up-to-date feedback from real travelers.
Vietnam eSIM Activation Step-by-Step: Frequently Asked Questions
- What if my QR code doesn’t scan?
Check your phone’s internet, increase screen brightness, or print the QR. Manual code entry is available on most phones. - Is Vietnam eSIM activation step-by-step the same for all phones?
The process is nearly identical for iPhone, Samsung, and Pixel—just minor menu name differences. - Can I activate Vietnam eSIM before arriving?
Yes! Many tourists do it from home, or even at the airport gate. - What if my eSIM doesn’t work?
Contact your provider’s support (e.g., GoVnSIM on WhatsApp, LINE, or Facebook) for instant troubleshooting. - How do I keep WhatsApp active after eSIM activation?
See our guide: How to keep WhatsApp active with Vietnam eSIM.
Vietnam eSIM Activation Step-by-Step: Top Tips for Each Phone Brand
- iPhone: Settings → Cellular → Add eSIM; sign into iCloud for backup.
- Samsung: Settings → Connections → SIM Manager → Add eSIM; restart after install.
- Pixel: Settings → Network & Internet → SIMs → Add SIM; ensure latest software.
Vietnam eSIM Activation Step-by-Step: Internal & Outbound Links
- Vietnam eSIM installation guide
- Vietnam eSIM reviews from international tourists
- What is eSIM? (GSMA official resource)
- GoVnSIM Trustpilot reviews
Vietnam eSIM Activation Step-by-Step: Contact & Support
- WhatsApp: +84 98 307 49 15
- LINE ID: anyaxiaoying
- Facebook: @govnsim